# Logon as the local Administrator
# Try to run the discovery process
# If it fails (as it did for me) open a command console
# Change directory to the following path: C:\Program Files (x86)\Citrix\Independent Management Architecture
# Type the following command: dsmaint config /user:administrator /pwd:Evaluation1 /dsn:"c:\Program Files (x86)\Citrix\Independent Management Architecture\mf20.dsn"
# For the password use your local administrator account password
# You will see the following output: \\ Attempting to connect to the data store with new configuration settings. \\ Successfully connected to the data store. \\ Configuration successfully changed. \\ Please restart the IMA Service for changes to take effect.
# Open Services in Admin Tools and stop the Citrix Independent Management Architecture
# Using the same command console type the following command: dsmaint recreatelhc
# Now restart the Citrix Independent Management Architecture service
# Try the discovery process again and it should work!
Life goes on!
Challenges make life interesting, however, overcoming them is what makes life meaningful. - Mark Twain
Tuesday, November 25, 2014
Monday, September 15, 2014
HOW TO: Enable the build-in Administrator account in Windows Vista and Windows 7
To enable the build-in Administrator account, follow these steps:
1. Click Start, and then type cmd in the Start Search box.
2. In the search results list, right-click Command Prompt, and then click Run as Administrator.
3. When you are prompted by User Account Control, click Continue.
4. At the command prompt, type net user administrator /active:yes, and then press ENTER.
5. Type net user administrator, and then press ENTER.
Note: Please replace the tag with your passwords which you want to set to administrator account.
6. Type exit, and then press ENTER.
7. Log off the current user account.
1. Click Start, and then type cmd in the Start Search box.
2. In the search results list, right-click Command Prompt, and then click Run as Administrator.
3. When you are prompted by User Account Control, click Continue.
4. At the command prompt, type net user administrator /active:yes, and then press ENTER.
5. Type net user administrator
Note: Please replace the
6. Type exit, and then press ENTER.
7. Log off the current user account.
Monday, January 20, 2014
Enabling Ping and Traceroute on the Cisco ASA 5505
Enabling Ping and Traceroute on the Cisco ASA 5505
Today I found some time to sit down and figure out why my ASA box was denying ping, traceroute and other ICMP traffic. Denying all ICMP traffic is the most secure option, and I think Cisco made a good choice by making this the default. However, I really wanted to be able to ping and traceroute from inside my network to the outside world, if for no other reason than to check the latency of my servers. Here’s how to do it in ASDM.
First, open an ASDM connection to your router. Go into the Configuration screens and click on Firewall to configure the firewall options. Then click on Service Policy Rules to configure the services that the firewall software will monitor. Select the global policy (first and only one in the list), and click on the Edit button. Switch to the Rule Actions (3rd) tab, and in the list check to enable ICMP. You can leave ICMP Error unchecked. Close that and Apply the changes.
Now, if you just want to be able to ping, stop here and you are done. However, traceroute will not work with this setup. For traceroute to work, you have to complete this follow-up task.
While still under the Firewall configuration switch to the Access Rules item. Add an access rule to permit ICMP traffic. Click the Add button, make sure the interface is set to outside, action is Permit, and Source/Destination is any. Under Service, click the … button and select the icmp line and click OK. Click OK again in the Add Access Rule dialog and Apply the results to finish the process.
Thursday, July 12, 2012
Putting Windows 2008 onto Flash Drive
Windows 2008 comes only on DVD and today you’d think every computer has a DVD drive by default, unfortunately most servers are ordered without them and that causes a problem obviously. Your choices would be to break the DVD into CD-ROMs (not fun) install over the network (a little more work than I wanted to do) or find another means to get it up. My solution, USB Thumb drive
Since Vista and Windows 2008 share the same code base, I figured someone must have found a way to boot vista off a thumb drive so I looked and found just that. Kurt Shintaku has a how-to on how to install Windows Vista from a high speed USB 2.0 Flash Drive.
Before you begin though, if your thumbdrive has U3 installed on it, you’ll probably want to remove that (I did just to be certain), here’s instructions on how to do that: http://www.u3.com/uninstall/
Using Kurt’s instructions this is all it took:
Format the thumb drive
1.from a DOS prompt execute: diskpart
2.list disk
3.select disk 1 (assuming disk 1 was your thumb drive in the above list disk command)
4.clean
5.create partition primary
6.select partition 1
7.active
8.format fs=fat32 quick
9.assign
10.exit
Copy the Win2008 install files
1.xcopy d:\*.* /s/e/f e:\ (assumes your dvd is drive D: and your thumb drive is drive E:\, adjust accordingly)
That’s all it took other than verifying the server BIOS was set to boot off of the USB device. But hey, don’t stop there! Check out the Windows Cloud Servers at www.appliedi.net and get your own Windows 2008 Server in the cloud in just 30 minutes, no USB device required!
Wednesday, May 30, 2012
My ringtones on iTunes
These links can only be reached from an iPhone/iPod/iPad. Alternative would be to open iTunes on your iPhone/iPod/iPad and search for "Zavernus Hamarabi".
Here is a list of my ringtones on iTunes:
"Dial-up Modem"

"Incoming Message" from Mechwarrior

"Ecto-1 Siren"

"Punch-Out - Title Screen"

"Faxanadu - First Town"

"Metal Gear Solid - Codec Alert"

"Metal Gear Solid - Found Alert"

"Super Mario Bros. 2 - Stage 1"

"Excitebike - Title Music"

"Tetris - Playing"

"Tiger Heli - Playing"

"Super Mario Bros. - Underworld"

"Super Mario Bros. - Swimming"

"Super Mario Bros. - Overworld"

Here is a list of my ringtones on iTunes:
"Dial-up Modem"
"Incoming Message" from Mechwarrior
"Ecto-1 Siren"
"Punch-Out - Title Screen"
"Faxanadu - First Town"
"Metal Gear Solid - Codec Alert"
"Metal Gear Solid - Found Alert"
"Super Mario Bros. 2 - Stage 1"
"Excitebike - Title Music"
"Tetris - Playing"
"Tiger Heli - Playing"
"Super Mario Bros. - Underworld"
"Super Mario Bros. - Swimming"
"Super Mario Bros. - Overworld"
Thursday, February 23, 2012
Lotus Notes Client Error CWPCA8522E Application
Error "CWPCA8522E Application did not get installed" is displayed on Standard client when opening the users mailfile.
To fix shut down the Notes client and then delete the following folders under the Data folder:
Data\workspace\.metadata\.plugins\com.ibm.portal.app
Data\workspace\.metadata\.plugins\com.ibm.rcp.portal.app
Restart the Notes client.
Thanks to Stephan Bovet for his post on the 8.5 forum for this solution.
Wednesday, February 15, 2012
Castelle Fax, How to Clean the ZQ Directory:
How to Clean the ZQ Directory:
--------------------------------------------------------------------------------
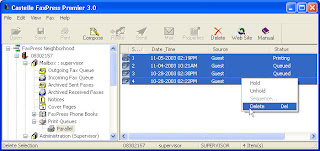
If you have a red light but can still log into FaxMain, then follow the steps as illustrated below:
Open FaxMain and login as a supervisor.
Expand to "Mailbox/Print Queues/Parallel"
Delete any jobs you see on the right panel.

The red light should go off now.
This queue represents jobs sent to the parallel port on the back of the FaxPress unit.
The reason the red light was on is because the jobs in the queue were sent by a user who did not have a valid print queue in their user profile. So the system sent the job to the default print queue. (See your manual for proper setup of the print queues for users under user profiles)
--------------------------------------------------------------------------------
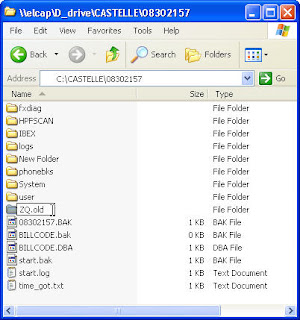
If you have a red light but can NOT log into FaxMain, then follow the steps illustrated below:(NOTE: This procedure will make your old faxes invisible to the FaxMain client. If you wish to view your old faxes after this, you'll need to access the uncompressed image files(PCX) directly from the old zq directory.
Step 1: Locate /CASTELLE/08XXXXX/ZQ and rename it to ZQ.OLD
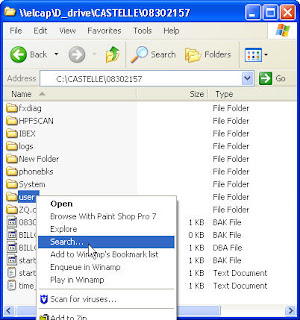
Step 2: Find all the "*.o" and "*.n" files under the USER directory and delete them.


Then, reboot the FaxPress UNIT.(the little black box)
The unit should come up, log in, and create a new ZQ directory.
If your unit doesn't come up within a few minutes, you may need to reinstall the FaxPress server over the top.
If the previous step fails, then rename the Castelle directory to Castelle.old and install as new. If this fixes the problem, you can copy the old USER and PHONEBKS directories to the new installation.
Subscribe to:
Posts (Atom)